
Materials:
Alize Cotton Gold (or any other one of your choice)
discretion) for pink dragonmagic ring – 518 (pink) and
149(raspberry, fuchsia), for green dragonmagic ring
522(mint) and 216(dark yellow),
Hook No. 1.75
Filler
Long and short magic ring needles for inching and embroidery
details
Pins
Marker or contrast thread
Eyelets on a secure mount 14mm or glass
12mm, felt circles optional d=2cm
Glue Moment Crystal (for gluing felt and
glass eyes) or super glue
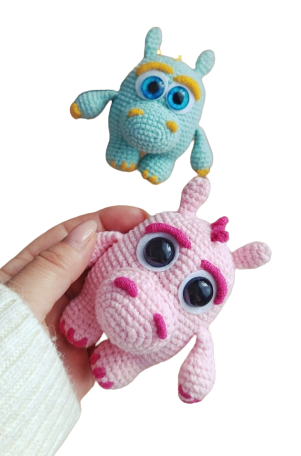
Growth of dragon magic ring taking into account magic ring materials
It turns out about 9-10cm with magic rings.
Legend:
MAGİC RING – amigurumi ring
sc – single crochet
ch – air loop
sl-st – connecting post
ps – bias loop
inc – incibavmagic ring from sc
dec – decаmagic ring
psl-stn – half double crochet
*n – number of repetitions, where “n” is the number of repetitions
(n) – number of columns in a row
Knitting all parts in a spiral.
I have a method of knitting “half crosses”, inc.
method, the offset of the beginning of the row is minimal.
IMPORTANT!!!
Hands. 2 details:
Pink thread.
1) 6MAGIC RING
2) inc*6 (12)
3) (3sc, inc)*3 (15)
4-5) 15sc
6) (3sc, dec)*3 (12)
We fill only the palm.
7) (4sc, dec)*2 (10)
8-10) 10sc (3 rows)
Fold the piece in half and tie it together at both edges.
5sc.
We cut the thread and fasten it.
Ears. 2 details:
Pink thread.
1) 6MAGIC RING
2) (1sc, inc)*3 (9)
3-4) 9sc
5) (1sc, dec)*3 (6)
6) 6sc
Cut the thread, leave the tip
for inking the part.
Muzzlemagic ring:
Pink thread. Behind
We follow the marker displacement by
we connect if necessary
bias loops.
1) Knit a chain of 6ch, then
inccontinue knitting from 2nd
loops from magic ring hook on both sides
chains: 4sc, 3sc in 1 loop,
3sc, inc (12)
2) inc, 3sc, inc*3, 3sc, inc*2 (18)
3) 1sc, inc, 3sc, (1sc, inc)*3,
3sc, (1sc, inc)*2 (24)
4) 2sc, inc, 3sc, (2sc, inc)*3,
3sc, (2sc, inc)*2 (30)
6-8) 30sc (3 rows)
Cut the thread, leave the tip
for inking the part.
Tail:
Raspberry thread.
1) 4MAGIC RING
2) (1sc, inc)*2 (6)
3) (1sc, inc)*3 (9)
4-5) 9sc
6) (1sc, dec)*3 (6)
Change the thread to pink,
cut off the raspberry.
7) (1sc, inc)*3 (9)
8) (2sc, inc)*3 (12)
9) (1sc, inc)*6 (18)
10-11) 18sc
12) (2sc, inc)*6 (24)
13) 9sc, 6psl-stн, 9sc (24)
14) 6sc, 12psl-stн, 6sc (24)
Cut the thread, leaving the tip
for incision.
Legs-body-head:
We start with the legs, thread
Pink colour. Filling in the details
in the process of knitting tightly.
First knifemagic ring:
1) 6MAGIC RING
2) inc*6 (12)
3) (1sc, inc)*6 (18)
4-6) 18sc
7) (4sc, dec)*3 (15)
8) 15sc
There is a thread on the first leg
cut and fasten.
We knit the second leg, but the thread
we don’t cut it.
We knit 3ch, then
inc we connect the first leg and
continue knitting in the round.
9) 15sc on the first leg,
3sc on ch, 15sc on second
leg, 3sc to ch (36)
10) (11sc, inc)*3 (39)
11) 6sc, inc, (12sc, inc)*2,
6sc (42)
12) (13sc, inc)*3 (45)
13) 7sc, inc, (14sc, inc)*2,
7sc (48)
14-18) 48sc (5 rows)
In the next row we knit
pens, having first outlined
five loops strictly according to the magic ring.
Because row offset for everyone
different, then the number of loops from
the beginning of the row until the moment
tying the first handle
many may differ.
I have:
19) 7sc on the body, 5sc
(we knit the loops together
body and 5 handle loops), 19sc
over the body, 5sc (inc knit
body loops and 5 loops together
second handle), 12 sc
body (48)
If you use
glass eyes or peepholes
on a secure mount
small diameter, then further
we knit:
20-27) 48sc (8 rows)
If you use eyes on
secure fastening
large diameter (12mm and
more), they usually have a thick
knifemagic ring, then in the 22nd row incopusmagic ring
one loop under the eyes,
having first outlined the place:
20-21) 48sc
22) 48sc (in the places for the eyes we knit ch and
incopusmagic ring (one column)
23) 48sc (including incotying sc to ch)
24-27) 48sc (4 rows)
In this toy, I have 7 loops between the magic ring eyes, and in
further we made a little magic ring, but you can leave it
less. If desired, you can make the whites of the eyes from felt.
28) 3sc, dec, (6sc, dec)*5, 3sc (42)
29) (5sc, dec)*6 (36)
30) 2sc, dec, (4sc, dec)*5, 2sc (30)
31) (3sc, dec)*6 (24)
32) (2sc, dec)*6 (18)
33) (1sc, dec)*6 (12)
34) dec*4, do not knit the remaining loops (8)
Cut the thread and leave the tip using a needle
tighten the hole by the front half-loops and inc.
tip inward.
Decor:
We sew all the details to the body (ears, muzzle and tail), in
add filler to the muzzle and tail.
We sew the muzzle approximately between the 13th and 20th rows.
Glass eyes
incicle over m horde,
optionally also using
felt or felt ready-made
circles.
Next we knit the mane,
having previously outlined
a line of magic ring clubs from the forehead to
ends of tailsmagic ring. See photo.
Inserting the hook under the posts on the head, we knit until
end sl-st.
Unroll the knitting, starting from the 2nd loop from the magic ring hook
inc we knit: 2 sc, inc, 3 ch in picot, and so on until the end.
We cut the thread and inc the tip inward.
We embroider claws on magic ringx paws. We make 2-3 magic ring stitches.
Using 3D embroidery we embroider eyebrows and nostrils,
first marking them with magic rings in the right places.
For the eyebrows I made 22 turns, for the nostrils about 10
rpm The number of turns depends on the size of your
details. Do not wrap the thread tightly around the needle, otherwise it will not
You will be able to remove the needle later.
OUR DRAGOTS ARE READY.