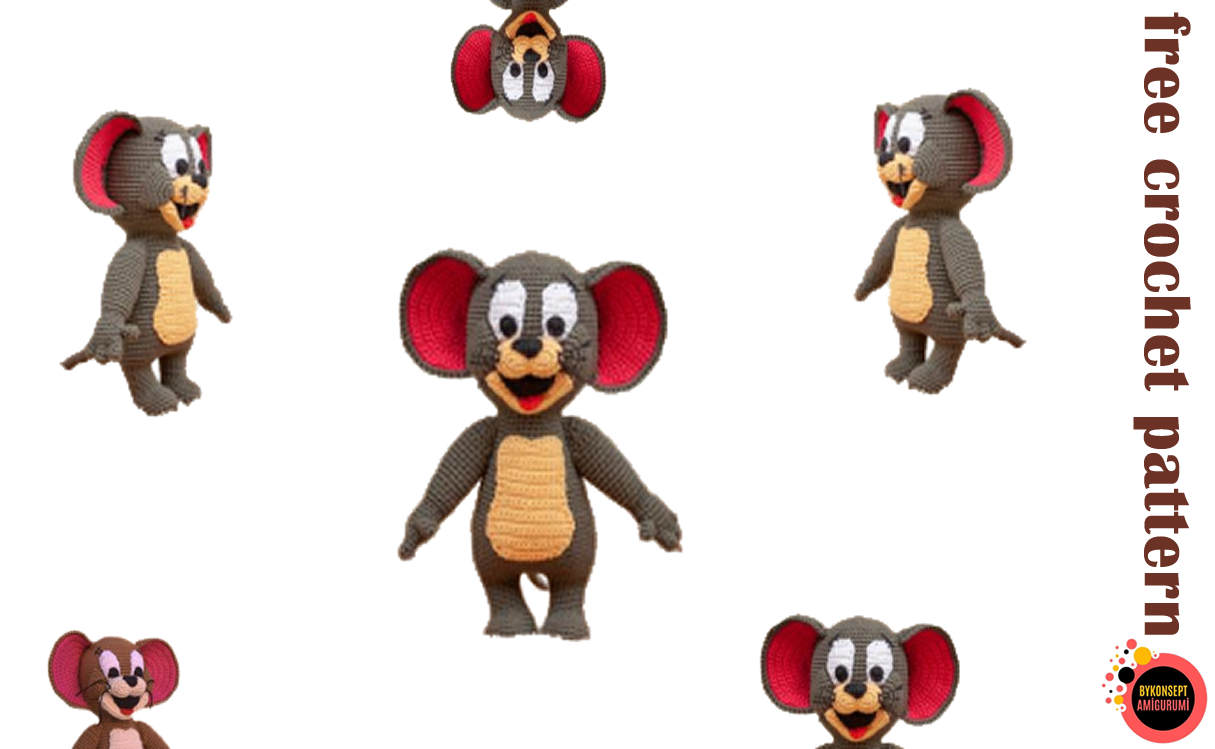
Hello dear amigurumi lovers, we share many amigurumi recipes with you in detail. The recipe we will share today will be the Tailed Mouse recipe.
It is really nice to knit amigurumi baby recipes. Tailed Mouse is a model that you will enjoy knitting. Make sure your kids will have a good time when this Tailed Mouse pattern is finished. Tailed Mouse may be different, but I can say this is the sweetest.
Amigurumi Tailed Mouse also helps you instill a love of animals in your children.
Don’t forget to check out our other free recipes.


Mouse
Material :
I used cotton yarn and a 2.5 mm hook.
For the main color you will need approx. 2 -2.5 (50g) balls , for the rest 1–1 balls or
less will be enough.
Polyester stuffing, black embroidery thread , yarn needle, stitch markers.
I made 2 versions using this pattern : the brown was with mercerized cotton, the grey
with 100% cotton, but you can use any kind of yarn. With mercerized cotton, the final
product will be a little bit smaller 24 cm (9.5 inches), mine with the 100 % cotton
turned out to be 28 cm (11 inches).
Abbreviations :
Sc – stitch
Inc – increase
Dec – decrease This pattern is for personal use, I ask
you not to share in any form and on
any platform.
However, you may sell the finished
product and if you don’t forget, you
can give credit to me, too.
Thank you!
Hdc – half double crochet
Dc – double crochet
Tr – treble crochet
Dtr – double treble crochet
( )* – repeat
The pattern is written in English, with US crochet terminology.
Notes :
Stuffing : I used polyester filling. Many times I read “stuff as you go”, but sometimes
it does not work for me, because I always find and catch the stuffing material – and it
makes me crazy! So, when I see a part that needs stuffing or a part that is too small
to be stuffed later, I put the filling in immediately.
With some parts – eyes, ears and shoulders – you will have to reverse the work. With
the eyes and ears, you will need a chain when you finish the row, then turn, but with
the shoulders you won’t, and you will skip the first stitch.
We are going to start with the legs, then make the body and the head. So, let’s start:
Belly patch – with light yarn
Chain 10, start from the 2nd chain
1.) Inc, 7 sc, inc, ch 1, turn (11)
2.) Inc, 9 sc, inc,ch 1, turn (13)
3.) Inc, 11 sc, inc,ch 1, turn (15)
4.) Inc, 13 sc, inc,ch 1, turn (17)
5.-6.) 17 sc (2 rows)
7.) Dec, 13 sc, dec, ch 1, turn (15)
8.) Dec, 11 sc, dec, ch 1, turn (13)
9.) 5 sc, dec, 6 sc, ch 1, turn (12)
10.-17.) 12 sc 8 rows
18.) Sc, hdc, dc, hdc, sc, 2 slst,
sc, hdc, dc, hdc, sc
(12)
Cut the yarn, leave a long tail to sew.
I highly recommend you to sew it on the body before the head, it will be easier. I
sewed the belly patch between rows 25 and 46.
Legs / Body / Head – main color
Begin with 6 chains, then from the 3rd sc from the
hook:
1.) 3 sc, 3sc in the end, than 3 sc and 3 sc in the end (12)
2.) 3 sc, 3 inc, 3 sc, 3 inc (18)
3.) 3 sc, ( sc, inc ) * 3, 3 sc, ( sc, inc ) * 3 , 3 sc (24)
4.) 3 sc, with hdc : 2 hdc, ( hdcinc, 2 hdc ) * 3, 3 sc,
( 2 sc, inc ) * 3
(30)
5.-7.) 30 sc (3 rounds)
8.) 3 sc, ( 2sc, dec ) * 3, 3sc ( 2 sc, dec ) *3 (24)
9.) 3 sc, ( sc, dec ) *3 , 12 sc (21)
10.) 4 sc, 3dec, 11 sc (18)
11.-17.) 18 sc (7 rounds)
FO and cut the yarn with the first leg, but with the second leg : slst 1 more , than
chain 3, slst into the second leg (I counted 7 sc backward from the finishing sc and
started here to connect the two legs).
The number of sc may vary when you count backwards, depending on the material
you use.
18.) 3 sc, ( inc, 6 sc ) *5, inc, 3 sc (48)
19.) ( 7 sc, inc ) * 6 (54)
20.) 4 sc, ( inc, 8 sc ) *5 , inc , 4 sc (60)
21.-28.) 60 sc (8 rounds)
29.) 9 sc, ( dec,18 sc ) *2, dec, 9 sc (57)
30.-31.) 57 sc (2 rounds)
32.) ( 17 sc, dec ) * 3 (54)
33.-34.) 54 sc (2 rounds)
35.) 8 sc, ( dec, 16 sc ) *2 , dec, 8 sc (51)
36.-37.) 51 (2 rounds)
38.) ( 15 sc, dec ) *3 (48)
39.-40.) 48 sc (2 rounds)
41.) 7sc, ( dec, 14 sc ) *2, dec, 7 sc (45)
42.-43.) 45 sc (2 rounds)
44.) ( 13 sc, dec ) * 3 (42)
45.) 42 sc (1 round)
46.) 6 sc, ( dec, 12 sc ) *2, dec, 6 sc (39)
47.) 39 sc (1 round)
48.) ( 11 sc, dec ) *3 (36)
49.) 5 sc, ( dec, 10 sc ) *2, dec, 5 sc (33)
50.) ( 9 sc, dec ) *3 (30)
We finished the body, here comes the head
51.) 2 sc, ( inc, 4 sc ) * 5, inc, 2 sc (36)
52.) ( 5 sc, inc ) * 6 (42)
53.) 3 sc, ( inc, 6 sc ) * 5 , inc, 3 sc (48)
54.) ( 7 sc, inc ) * 6 (54)
55.) 4 sc, ( inc, 8 sc ) * 5 , inc, 4 sc (60)
56 .) 60 sc (1 round)
57.) ( 9sc, inc ) * 6 (66)
58.-74.) 66 sc (17 rounds)
75.) ( 9sc, dec ) * 6 (60)
76.) 4 sc, ( dec, 8 sc ) * 5 , dec, 4 sc (54)
77.) ( 7 sc, dec ) * 6 (48)
78. ) 3 sc, ( dec, 6 sc ) * 5 , dec, 3 sc (42)
79.) ( 5 sc, dec ) * 6 (36)
80.) 2 sc, ( dec, 4 sc ) * 5 , dec, 2 sc (30)
81.) ( 3 sc, dec ) * 6 (24)
82.) 1 sc, ( dec, 2 sc ) * 5 , dec, 1 sc (18)
83.) ( 1 sc, dec ) * 6 (12)
I usually finish here, then with the yarn needle, I insert the needle at every front
loop, pull the yarn tight and finish it. If you need help to learn how to do this, search
videos for ‘How to finish amigurumi’.
84.) Dec * 6 (6)
Cut the yarn and FO
Eyes – white part
Right eye Left eye
Chain 4, from the 2nd chain Chain 4, from the 2nd chain
1.) Sc, sc, inc, ch 1, turn (4) 1.) inc, sc, sc, ch 1, turn (4)
2.) Inc, 3 sc, ch 1, turn (5) 2.) 3 sc, Inc, ch 1, turn (5)
3.) 4 sc, inc, ch 1, turn (6) 3.) Inc, 4 sc, ch 1, turn (6)
4.-5.) 6 sc , ch 1, turn (2 rows) 4.-5.) 6 sc, ch 1, turn (2 rows)
6.) Sc, inc, 4 sc, ch 1, turn (7) 6.) 4 sc, inc, sc, ch 1, turn (7)
7.) Sc, dec, 4 sc, ch 1,
turn
(6) 7.) 4 sc, dec, sc , ch 1, turn (6)
8.) 3 dec, ch 1, turn (3) 8.) 3 dec, ch 1, turn (3)
Pupils : magic ring, sc, hdc, dc, hdc, sc – cut the yarn, leave a tail
Sew the pupils on the eyes, then the eyes on the head between rows 13–14 or 14–
15. (I probably sewed the grey’s eyes a bit higher than the brown’s eyes, that’s why I
added 2 options.)
The muzzle’s upper side should be in the same row where you sewed the eyes’ lower
parts.
I sewed the brown mouse’s pupils
differently from the grey’s pupils.
This guy’s pupils are sewed on like a half
circle, I did not join in the end.
And don’t forget the eyebrows and –lashes. For this, use thread or a thinner black
yarn.
Muzzle – with light yarn
Chain 8, then from the 3rd chain from the hook:
1.) 5 sc, 4 sc into the last sc, on the other side 5 sc and
4 sc into the last sc
(18)
2.) 5 sc, 4inc, 5 sc, 4 inc (26)
3.-4.) 26 sc (2 rows)
Cut the yarn, leave a tail to sew.
The 4 sc will be here
After you sew on the muzzle, don’t cut the
yarn, or with another piece of yarn, of the
same type, sculpt the muzzle on, as in the
picture.
Nose – with black yarn
6-7 dc into a magic ring – I made 2 chains,
than 6 dc and 2 chain at the end, slip
stitched that last chain into the ring and
FO.
Smiling lip
with light yarn, same color as the muzzle
Chain 18, then from the 3rd chain from the hook:
1.) 15 sc, 3 sc into the last chain, 15 sc on the other side
and 3 sc into the last loop
(36)
2.) 3 hdc, 9 sc, 3 hdc, 3 dc, 3 hdc, 9 sc, 3 hdc, 3 dc (36)
Cut the yarn, leave a long tail.
Hint: you can stuff the corners if you like.
Sew the lip on, to the face, like this. You can put a little stuffing in the corners.
Mouth – black part Mouth – red part
Magic ring and chain 5, than 1 trtr, 6 dc, 1 dtr,
and cut the yarn, leave a tail.
Magic ring and chain 2, then make
4 dc, chain and stitch back into the
ring, FO and leave a tail.
If this does not fit for you, don’t worry, you can
maybe use felt, too. Just fill the area.
Cheeks – body color, make 2
1.) 6 sc into a magic ring (6)
2.) 6inc (12)
3.) ( 1 sc, inc ) *6 (18)
4.-6.) 18 sc (3 rows)
7.) 9 sc (9)
Cut the yarn, FO, leave a tail to sew.
Don’t stuff them.
First, sew the 9 sc into the head.
You can see how I sew them on, in the
next three pictures.
Tail – main color
As it starts with the 5 sc into a ring , I did
not use any markers, I just went on like
this:
50 sc, inc, 41 sc, inc, 55 sc, inc, 23 sc, inc,
44 sc, inc, 29 sc, ( 2 sc, inc ) * 4 and more
rows with 12 sc
Cut the yarn and leave a tail.
Ears
Inner ears – make 2
Chain 1 and turn in every row, we are making a half circle
1.) 3 sc into a magic ring (3)
2.) 3inc (6)
3.) ( sc, inc ) * 3 (9)
4.) Sc, ( inc, 2 sc ) *2, inc, sc (12)
5.) ( 3sc, inc ) *3 (15)
6.) 2 sc, ( inc, 4 sc ) *2, inc, 2sc (18)
7.) ( 5sc, inc ) *3 (21)
8.) 3 sc, ( inc, 6 sc ) *2, inc, 3 sc (24)
9.) ( 7 sc, inc ) * 3 (27)
10.) 4 sc, ( inc, 8 sc ) *2, inc, 4 sc (30)
11.) ( 9 sc, inc ) *3 (33)
12.) 5 sc, ( inc, 10 sc ) *2, inc, 5 sc (36)
Cut the yarn, FO
The inner ear is the pink, the outer ear is
the grey part.
Outer ears – main color, make 2
Important : after you made the first outer ear, do not cut the yarn; we have to join
the two pieces , the inner and the outer ears!
It’s the same as the inner ear, just add 1 more row:
13.) ( 11 sc, inc ) * 3 (39)
After you finished the 13th row, sc 1 more sc, and take the other ear:
Face them with the wrong sides, then stitch the two parts together – insert the hook in
both inner and outer ears.
First, sc together the lower part with 11 sc – because the inner ears are bigger, make 2
decreases, but only on the inner part. Stitch 2 sc into the corners.
This is the decrease. You should have 3
loops first, than sc into the inner part,
that’s the 4th and pull through all the 4
loops.
Now the circled part comes – decrease every increase on the outer (main color) part.
Sc one more in the corner if it is necessary, then cut the yarn and leave a tail.
Make spaces between the eyes and ears,
5-6 sc.
Form a C with the ears and sew them on
to the head.
FINGERS, HANDS and ARMS


main color, make 2
Let’s start with the fingers! You will make two sets of them, 4 and 4 fingers.
1.) 6 sc into a mg (6)
2.- 4.) 6 sc (3 rows)
Cut the yarn FO – make 3 like this
With the 4th in the 4th row, make just 3 sc and join the next two
fingers.
5. ) 3 sc into the middle finger, 6 sc into the little finger, 3 sc – don’t sc
into the first fingers 3 sc.
(18)
Place the marker here, this will be the beginning
6.) 18 sc (1row)
7.) 8 sc – here we are joining the thumb – 3 sc in both fingers, 7 sc (18)
8.) 8 sc, now only stitch into the remaining 3 sc on the finger, 7 sc (18)
9.) 18 sc (1 row)
10.) 2sc, ( dec, 4 sc ) * 2, dec, 2 sc (15)
11.) ( 3 sc, dec ) * 3 (12)
12.) ( 3sc, inc ) * 3 (15)
13.) 2sc, ( inc, 4 sc ) * 2, inc, 2 sc (18)
14.-16.) 18 sc (3 rows)
17.) ( 5sc, inc ) * 3 (21)
18.-24.) 21 sc (7 rows)
Almostfinished. Now, the shoulders!
Left arm Right arm
25.) 13 sc, dec, turn 25.) 4 sc, dec, turn
26.) 13 sc, dec, turn (14)
27.) 13 sc, turn (13)
28.) Dec, 8 sc, dec (10)
29.) 9 sc (9)
30.) Dec, 4 sc, dec (6)
31.) 3 sc, dec (4)
Do not chain 1 and
skip the first sc in every row.
When you decrease, count that sc as 1.
Sew the arm onto the body.
The purple pin is the end of the body (row 50). Place the arm’s upper part in row 47
and sew it on. You should make a square when you sew it on, that will form the
shoulder.
Don’t forget the eyebrows and -lashes .
The mouse is finished, enjoy.