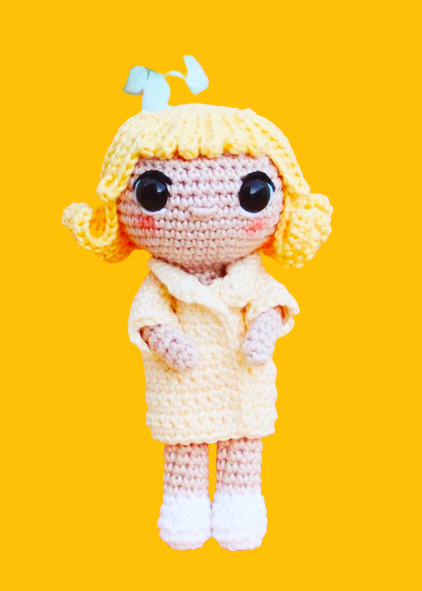
Today, I shared Singer Billie Eilish’s amigurumi doll that we all love so much. You can easily make the Amigurumi Billie Eilish pattern step by step. Thanks to the creator of the free pattern, you can knit amigurumi dolls for your loved ones and children. You can crochet for your friends who love Amigurumi Billie Eilish doll. They will be delighted with this wonderful gift. Take a look below for our free recipe.
Designate
Instagram: Madugurumi
Materials
• thread
*white
*cream
*pale yellow
*light skin color
- embroider the eyes with a little black and light thread
*blue
• 2.5 mm hook needle
• material to structure the head, the one of your choice
• craft glue
• 11mm eyes
• fiber load
• needle to sew the parts
• yarn for the arms
Abbreviations
(ml) (ch): Chain, Air stitch
(MR): Magic Ring
(sc) (sc): single crochet
(3sm) (sc3tog): 3 sc in the same stitch
(increase) (inc): increase
(dim) (dec): decrease, decreasing, decreasing
(d-br,dble.b) (tr): Double flange
(M) (st): Stitch (st) stitch
(br) (dc): bridle
(dB) (hdc): half flange
(sl) (sl-st): slip stitch, small stitch
(FLO): work only in front loops
(BLO): work only in the back loops
(lpn)(Bs): the nope point
(F.o.): Stop the thread.
(db / dbr) (dtr): Double Flange
(mct) (tch): chain stitches to turn
Foot / Leg
white thread
Rnd 1. 6 ms- MR
Rnd 2. 6 increase (12)
Rnd 3. 12 ms
Rnd 4. 12 ms
Rnd 5. 4 sc, 2 dec, 4 sc (10)
Rnd 6. 4 sc, 1 dec, 4 sc (9)
Change to a light flesh colored yarn
Round 7-11. 9 sc (5 rows)
Switch to white yarn
Round 12-14. 9 sc (3 rows)
First leg. Sew the thread
second leg
- 9 sc + 2 ch Join legs (next st is on leg 1) + 9 sc + 2 sc inside the 2 ch next st is beginning of row mark
put fiber filler
Body
Round 16-18. 22 sc (3 rows)
Rnd 19. 5 sc + 1 dec + 9 sc + 1 dec + 4 sc (20)
Rnd 20. 4 sc + 1 dec + 8 sc + 1 dec + 4 sc (18)
Round 21-24. 18 sc (4 rows)
Change to a light flesh colored yarn
put fiber filler
Rnd 25. 1 sc, 1 dec
Rnd 26. Sun 6
Rnd 27. 6 ms
Arm(x2)
Rnd 1. 6 ms- MR
Round 2-12. 6ms
Do not put fiber filler
Put the thread in one of the arms, pass it through the body until it reaches the other side where the other arm will be, put the thread in the other arm and sew it
Head
Rnd 1. 6 ms- MR
Rnd 2. 6 increase (12)
Rnd 3. 1 sc, 1 inc (18)
Rnd 4. 2 sc, 1 inc (24)
Rnd 5. 3 sc, 1 inc (30)
Rnd 6. 4 sc, 1 inc (36)
Rnd 7. 5 sc, 1 inc (42)
Round 8-14. 42 sc (7 rows)
Place the eyes between rows 11 and 12 with a distance of 7 sc, and embroider it with white, black and light blue thread (photo).
Embroider the nose as in the photo between rows 10 and 11
Rnd 15. 5 sc, 1 inc (36)
Rnd 16. 4 sc, 1 inc (30)
Rnd 17. 3 sc, 1 inc (24)
Rnd 18. 2 sc, 1 inc (18)
Rnd 19. 1 sc, 1 inc (12)
Rnd 20. 6 Sun
Sew the thread
Hair
light yellow yarn
Rnd 1. 6 ms- MR
Rnd 2. 6 increase
Rnd 3. 1 sc, 1 inc
Rnd 4. 2 sc, 1 inc
– 8 strands of hair: 1 sc + 21 ch + start at second ch 20 sc + 1 sl st
– 1 strand of hair: 1 sc + 11 ch + start at second ch 10 sc + 1 sl st
– 6 strands of hair: 1 sc + 6 ch + start at second ch 5 sc + 1 sl st
– 1 strand of hair: 1 sc + 11 ch + start at second ch 10 sc + 1 sl st
– 8 strands of hair: 1 sc + 21 ch + start at second ch 20 sc + 1 sl st
Sew the thread
With pins puts the parts before gluing (photos)
Then with craft glue, glue the strands of hair
Cardigan
Cream
Rnd 1. 31ml
Rnd 2. start on the 2nd ch do 30 sc + 1 ch and turn
Rnd 3. BLO 30 sc + ch 1 and turn
Rnd 4. 30 sc + ch 1 and turn
Rnd 5. 5 sc + 5 ch skip 5 sc and make 10 sc + 5 ch skip 5 sc and repeat 5 sc + 1 ch and turn
Round 6-15. 30 sc + 1 ch and turn
Rnd 16. 30ms
+3 sc inside the same stitch nor go around the whole cardigan with sc and make sl sts when you reach the end (photo)
Sleeves
Rnd 1. connect yarn in sleeve space and do 12 sc
Round 2-5. 12 sc (4 rows)
Assembly
Glue the hair, apply the blush to the cheeks and dress the cardigan on Billie.
